

Introduction in Alex Guarnaschelli’s Writing Style
Hey Kitchies! Let me take you on a culinary adventure that doesn’t require an oven. Yes, you read that right—this No-Oven Stovetop Bread is the answer to your bread cravings when your oven is out of commission, or you just want to keep things simple. Imagine warm, fluffy bread cooked right on your stovetop, perfect for sandwiches, dipping, or even just slathering with butter and honey.
This recipe takes the fear out of breadmaking. It’s an approachable, foolproof method that results in soft, golden-brown bread with a perfectly tender crumb. The best part? You don’t need any fancy equipment, just a pan with a lid and some basic ingredients you probably already have in your kitchen.
There’s something magical about the simplicity of this recipe. It’s the kind of bread that brings comfort on a rainy afternoon or becomes a surprise hit at a dinner party when you casually tell everyone it was made on your stovetop. Let’s dive in and make some magic!
Recipe Overview in Todd Wilbur’s Writing Style
What if I told you that you could make delicious, soft, and golden bread without even turning on your oven? This stovetop bread is a game-changer, delivering bakery-level results with nothing more than a skillet and a lid.
Perfect for beginners and pros alike, this recipe is versatile, easy, and quick to make. Whether you’re looking for a side to pair with soup or the ultimate vessel for your favorite spread, this stovetop bread has got you covered.
Exciting Story
I’ll never forget the first time I made this stovetop bread. It was during a summer heatwave, and there was no way I was going to turn on the oven. My husband was skeptical—“Bread? On the stovetop?”—but as soon as he bit into that first piece, he was hooked. Now, it’s become a staple in our home, especially on lazy weekends when we want something fresh and warm without too much effort. Even the kids love helping roll out the dough, and we always have fun experimenting with different toppings and flavors.
Why This No-Oven Stovetop Bread?
- No Oven Required: Perfect for hot summer days or when your oven is occupied.
- Quick & Easy: No complicated steps, just mix, knead, and cook.
- Customizable: Add herbs, cheese, or garlic for endless variations.
- Beginner-Friendly: A great starting point for anyone new to breadmaking.
- Delicious Results: Soft, fluffy bread with a golden crust.
Cuisine
Universal
Tips
- Keep the Heat Low: Cooking over low to medium heat prevents the bread from burning before it’s fully cooked inside.
- Rest the Dough Between Rolls: Let the shaped dough rest for 10 minutes before cooking to relax the gluten.
- Use a Heavy Lid: A lid traps steam, helping the bread cook evenly.
- Add Flavors: Sprinkle the dough with sesame seeds, garlic powder, or herbs before cooking for extra flavor.
Substitutions and Variations
- Whole Wheat Version: Replace up to half of the all-purpose flour with whole wheat flour.
- Dairy-Free: Use coconut oil or vegetable oil instead of olive oil.
- Sweet Bread: Add 1-2 tablespoons of honey to the dough for a slightly sweet twist.
- Stuffed Bread: Fill the discs with cheese, cooked spinach, or caramelized onions before sealing and cooking.
Make a Healthier Version
- Low-Sodium: Reduce the salt to ½ tsp.
- High-Fiber: Add 1 tbsp of ground flaxseed or chia seeds to the dough.
- Lower Carb: Substitute some of the flour with almond or coconut flour, but note that the texture will change.
Closing in Todd Wilbur’s Style
And there you have it—stovetop bread that’s simple, versatile, and downright delicious! With just a skillet and a few pantry staples, you can whip up a batch of fresh, homemade bread that’s perfect for any occasion. Go ahead, give it a try, and don’t forget to share your favorite twists on this classic recipe!
Relevant Categories: Bread Recipes, Quick Recipes, No-Oven Recipes, Beginner Baking
Tags: Stovetop Bread, No-Oven Bread, Easy Bread Recipe, Flatbread, Quick Bread
Frequently Asked Questions
- Can I use active dry yeast instead of instant yeast?
Yes, just activate it in warm water with sugar before adding it to the flour. - What’s the best type of skillet to use?
A nonstick or cast-iron skillet works best for even cooking. - Can I freeze the dough?
Absolutely! Freeze it after the first rise and thaw in the fridge overnight before shaping and cooking. - How do I store leftover bread?
Store in an airtight container at room temperature for up to 2 days or freeze for longer storage. - Can I double the recipe?
Yes, simply double the ingredients, but cook the bread in batches as needed. - What can I serve this bread with?
It’s perfect with soups, stews, curries, or as a base for sandwiches!
Enjoy this no-oven wonder, Kitchies! 🥖✨
Print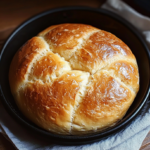
No-Oven Stovetop Bread
Description
Let me take you on a culinary adventure that doesn’t require an oven. Yes, you read that right—this No-Oven Stovetop Bread is the answer to your bread cravings when your oven is out of commission, or you just want to keep things simple.
Ingredients
- 2½ cups all-purpose flour
- 1 tsp salt
- 1 tsp sugar
- 1 tsp instant yeast
- ¾ cup warm water (around 110°F/43°C)
- 2 tbsp olive oil (plus more for greasing)
Instructions
- Activate the Yeast:
- In a small bowl, mix the warm water, sugar, and yeast. Let it sit for 5-10 minutes until it becomes frothy.
- Make the Dough:
- In a large mixing bowl, combine the flour and salt. Gradually add the yeast mixture and olive oil, stirring until a shaggy dough forms.
- Knead the Dough:
- Turn the dough onto a lightly floured surface and knead for 8-10 minutes until smooth and elastic. Alternatively, use a stand mixer with a dough hook.
- Let It Rise:
- Grease a bowl with olive oil, place the dough inside, and cover with a damp towel or plastic wrap. Let it rise for 1 hour or until doubled in size.
- Shape the Dough:
- Once risen, punch down the dough and divide it into 4-6 equal portions. Shape each portion into a ball, then flatten slightly into discs.
- Cook the Bread:
- Heat a nonstick skillet or cast-iron pan over low to medium heat. Lightly grease the pan with olive oil.
- Place a dough disc into the pan, cover with a lid, and cook for 4-5 minutes until the bottom is golden. Flip and cook the other side for another 4-5 minutes. Repeat with the remaining dough.
- Serve Warm:
- Let the bread cool slightly on a wire rack, then serve warm with your favorite toppings or dips.