

Hey Kitchies! Get ready for the easiest, crunchiest peanut butter treat ever!
Introduction in Alex Guarnaschelli’s Writing Style
Some desserts are all about nostalgia—the kind that instantly takes you back to childhood lunchboxes and after-school snacks. These Peanut Butter Crunch Bars are exactly that. A little salty, a little sweet, and incredibly satisfying, they’re the perfect no-bake treat when you’re craving something indulgent but don’t want to turn on the oven.
At their heart, these bars are a simple combination of creamy peanut butter, crispy rice cereal, and a luscious layer of chocolate on top. But don’t let their simplicity fool you—every bite delivers an irresistible mix of textures. The crunch from the cereal, the smoothness of the peanut butter, and the snap of the chocolate topping make for a treat that disappears fast.
Perfect for potlucks, lunchbox treats, or late-night cravings, these bars come together in just minutes with a handful of pantry staples. And the best part? No baking required! Just mix, press, chill, and enjoy.
Resume of the Recipe in Todd Wilbur’s Writing Style
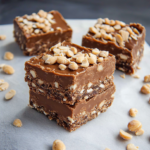
These Peanut Butter Crunch Bars take classic flavors and turn them into an easy, no-bake dessert that delivers on both taste and texture. A crunchy peanut butter and rice cereal base is topped with a thick layer of silky chocolate, creating a treat that’s rich yet satisfyingly crisp.
This recipe is foolproof—just mix, press, and chill for a dessert that’s ready in no time. Whether you need a quick snack, a make-ahead party dessert, or a nostalgic bite of peanut butter goodness, these bars are guaranteed to hit the spot.
Exciting Story
Growing up, my mom used to make peanut butter bars as a special treat, and they never lasted more than a day in our house. I remember sneaking into the kitchen, lifting the corner of the parchment paper, and breaking off a little piece just to “test” them. Of course, one bite turned into two, and before I knew it, half the batch was gone.
Fast forward to today, and these bars are still a favorite in my family. My husband, a self-proclaimed peanut butter addict, swears they’re better than store-bought treats, and my kids love them in their lunchboxes. Every time I make them, it’s like reliving those childhood memories—except now, I’m the one catching my kids sneaking extra bites!
Why These Peanut Butter Crunch Bars?
Selling Points
- No-Bake Simplicity: Quick and easy—just mix, press, and chill!
- Perfect Crunch: Crispy rice cereal adds the best texture.
- Chocolate + Peanut Butter Perfection: A classic combo that never fails.
- Make-Ahead Friendly: Ideal for parties, meal prep, or gifting.
- Minimal Ingredients: You probably have everything in your pantry right now.
Cuisine: American, No-Bake Desserts
Ingredients
For the Peanut Butter Crunch Base:
- 2 cups crispy rice cereal (like Rice Krispies)
- 1 cup creamy peanut butter
- ½ cup honey (or light corn syrup)
- ¼ cup unsalted butter
- 1 teaspoon vanilla extract
- ¼ teaspoon salt
For the Chocolate Topping:
- 1½ cups semisweet chocolate chips (or dark chocolate)
- 2 tablespoons peanut butter
How to Make Peanut Butter Crunch Bars
Step 1: Prepare the Base
Line an 8×8-inch baking dish with parchment paper. In a medium saucepan over low heat, melt the peanut butter, honey, and butter together, stirring until smooth. Remove from heat and stir in vanilla and salt.
Step 2: Add the Crunch
In a large bowl, pour the peanut butter mixture over the crispy rice cereal. Gently fold everything together until evenly coated. Press the mixture firmly into the lined baking dish using a spatula or the back of a spoon.
Step 3: Make the Chocolate Topping
In a microwave-safe bowl, melt the chocolate chips and peanut butter in 20-second intervals, stirring between each, until smooth and glossy. Pour over the peanut butter layer and spread evenly.
Step 4: Chill and Slice
Refrigerate for at least 1 hour, or until the chocolate is set. Once firm, lift the bars out of the pan using the parchment paper and cut into squares.
Tips for the Best Peanut Butter Crunch Bars
- Use high-quality peanut butter for the best flavor (natural or classic both work).
- Press the base firmly to ensure the bars hold together when slicing.
- For a softer texture, let the bars sit at room temperature for 5 minutes before cutting.
- Want a glossy chocolate top? Add 1 teaspoon of coconut oil when melting the chocolate.
Substitutions and Variations
- Nut-Free: Swap peanut butter for sunflower seed butter.
- Extra Crunchy: Mix in chopped peanuts or pretzel pieces.
- Lower Sugar: Use dark chocolate and swap honey for sugar-free syrup.
- White Chocolate Drizzle: Drizzle melted white chocolate over the top for a fancy touch.
Make a Healthier Version
- Use natural peanut butter without added sugar or hydrogenated oils.
- Replace honey with maple syrup for a refined sugar-free option.
- Use 85% dark chocolate for a lower-sugar topping.
- Add flaxseeds or chia seeds for an extra nutrient boost.
Closing in Todd Wilbur’s Style
And there you have it—Peanut Butter Crunch Bars that are easy, nostalgic, and dangerously addictive! Whether you’re whipping them up for a party, a lunchbox treat, or just because, these bars are guaranteed to be a crowd-pleaser. Try them once, and they’ll be a staple in your kitchen forever!
Relevant Categories
Desserts, No-Bake Treats, Snacks, Kid-Friendly Recipes
Tags
peanut butter bars, no-bake desserts, easy treats, chocolate peanut butter, crispy rice bars
Frequently Asked Questions
- Can I use crunchy peanut butter instead of creamy? Yes! It adds an extra layer of texture.
- What’s the best way to cut these bars neatly? Use a sharp knife and run it under warm water before slicing.
- Do these bars need to be refrigerated? They stay firmer in the fridge but can be stored at room temperature.
- Can I make these ahead of time? Absolutely! They stay fresh for up to a week in an airtight container.
- How do I prevent the chocolate from cracking when slicing? Let them sit at room temperature for 5 minutes before cutting.
- Can I freeze them? Yes! Wrap them individually and store in an airtight container for up to 3 months.
- What’s a good substitute for crispy rice cereal? Crushed cornflakes or puffed quinoa work well.
- Can I use milk chocolate instead of semisweet? Definitely—just know they’ll be a bit sweeter.
- What if I don’t have honey? Light corn syrup or maple syrup works as a substitute.
- How do I make these vegan? Use dairy-free chocolate and maple syrup instead of honey.
Peanut Butter Crunch Bars
Description
These Peanut Butter Crunch Bars take classic flavors and turn them into an easy, no-bake dessert that delivers on both taste and texture. A crunchy peanut butter and rice cereal base is topped with a thick layer of silky chocolate, creating a treat that’s rich yet satisfyingly crisp.
Ingredients
For the Peanut Butter Crunch Base:
- 2 cups crispy rice cereal (like Rice Krispies)
- 1 cup creamy peanut butter
- ½ cup honey (or light corn syrup)
- ¼ cup unsalted butter
- 1 teaspoon vanilla extract
- ¼ teaspoon salt
For the Chocolate Topping:
- 1½ cups semisweet chocolate chips (or dark chocolate)
- 2 tablespoons peanut butter
Instructions
Line an 8×8-inch baking dish with parchment paper. In a medium saucepan over low heat, melt the peanut butter, honey, and butter together, stirring until smooth. Remove from heat and stir in vanilla and salt.
In a large bowl, pour the peanut butter mixture over the crispy rice cereal. Gently fold everything together until evenly coated. Press the mixture firmly into the lined baking dish using a spatula or the back of a spoon.
In a microwave-safe bowl, melt the chocolate chips and peanut butter in 20-second intervals, stirring between each, until smooth and glossy. Pour over the peanut butter layer and spread evenly.
Refrigerate for at least 1 hour, or until the chocolate is set. Once firm, lift the bars out of the pan using the parchment paper and cut into squares.