

Hey, Holiday Bakers!
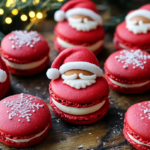
Is it even Christmas without a little festive magic in the kitchen? Imagine biting into a light, airy macaron filled with creamy goodness and decorated to look like Santa Claus himself. These Santa Claus Macarons are as delightful to make as they are to eat, bringing holiday cheer with every bite.
Let me take you to a cozy December afternoon when I first tried my hand at these whimsical treats. The kitchen was alive with laughter, powdered sugar clouds, and the scent of almond sweetness. Decorating these macarons became a family affair, and the joy of seeing Santa’s cheerful faces lined up on the tray made the effort worthwhile.
Whether you’re hosting a holiday party, looking for an edible gift, or just want to create a magical memory, these macarons are the perfect holiday project. Let’s dive into the recipe and create something truly special this season!
Why These Santa Claus Macarons Are a Holiday Must-Have
- Festive Charm: These macarons are irresistibly adorable and a show-stopper at any holiday gathering.
- Delicious Delight: The combination of a crisp shell and creamy filling makes them a crowd favorite.
- Creative Fun: Decorating them as Santa is a joyful activity for kids and adults alike.
Tips for Perfect Santa Claus Macarons
- Room Temperature Eggs: Always use room-temperature egg whites for the fluffiest meringue.
- Accurate Weighing: Precise measurements ensure consistency.
- Resting Time: Don’t skip the resting phase; it creates the signature macaron shell.
- Patience: Decorating takes time, but the adorable results are worth it!
Substitutions and Variations
- Flavors: Swap vanilla for peppermint or almond extract in the buttercream for a festive twist.
- Colors: Try green shells for an elf-themed variation.
- Filling: Use chocolate ganache or cream cheese frosting instead of buttercream.
Make a Healthier Version
Use sugar substitutes like erythritol for the shells and filling to reduce the sugar content.
Closing
And there you have it—Santa Claus Macarons, the ultimate holiday treat to make your celebrations magical. They’re whimsical, delicious, and perfect for sharing (or keeping to yourself!). Don’t forget to snap a photo before they’re devoured, and let us know how they turned out. Happy holidays, and happy baking!
Categories: Dessert, Holiday Recipes, Christmas Treats
Tags: Macarons, Santa Claus, Holiday Baking, Festive Desserts, Christmas Recipe
Frequently Asked Questions
Q: Can I make macarons without almond flour?
A: Almond flour is essential for macarons. For nut-free options, try sunflower seed flour.
Q: How long can I store macarons?
A: Store them in an airtight container in the fridge for up to a week.
Q: Can I skip the resting phase?
A: No, resting is crucial for forming the macaron’s characteristic smooth top.
Q: Why are my macarons hollow?
A: This often happens due to overmixing or underbaking. Keep practicing—it’s part of the process!
Santa Claus Macarons: The Ultimate Festive Treat
- Total Time: 1 hour 40 minutes
Description
These Santa Claus Macarons are as delightful to make as they are to eat, bringing holiday cheer with every bite.
Ingredients
Macaron Shells
- 100 grams Domino® Golden Sugar
- 4 grams egg white powder optional, read notes
- 100 grams egg whites
- 105 grams almond flour
- 105 grams Domino® Powdered Sugar
Royal Icing
- 1 1/2 cups Domino® Powdered Sugar 187 grams
- 1 tbsp meringue powder
- 4 tbsp water
- 2 drops black gel food coloring
- 1 drop yellow gel food coloring
Sugar Cookie Buttercream
- 1/2 cup all-purpose flour 63 grams
- 1/2 cup unsalted butter 113 grams
- 1/4 cup Domino® Golden Sugar 50 grams
- 1 1/4 cup Domino® Powdered Sugar 156 grams
- 1 tsp vanilla extract
- 1/8 tsp almond extract
- 1/2 tbsp milk or heavy cream
- 1/4 cup desiccated coconut shredded (50 grams)
Instructions
-
-
Before you start, get all of the ingredients ready. Prepare a large piping pastry bag, fitted with a large round tip, I use a 1/4” diameter tip. Set aside. Line two baking sheets with parchment paper or silicone mat. I use a baking mat with the macaron template already in it. Measure out all of the ingredients. Sift the powdered sugar and almond flour together. Set it aside.
-
Start pre-heating the oven. I pre-heat my large oven to 300ºF for 60 to 90 minutes, this helps with temperature fluctuations. Oven temperature will vary a lot depending on your oven, it’s good to experiment with different temperatures to find out what’s the best for you. If you are using a convection oven, lower the temperature to 270ºF and experiment from there, raising or lowering the temperature as needed.
-
-
-
Place a bowl over a pan with barely simmering water. Add the granulated sugar and egg white powder to the bowl if using. If you’re not using egg white powder simply skip it, nothing needs to be changed in the recipe.
-
Whisk the sugar and egg white powder so it doesn’t clump up.
-
Add the egg whites to the bowl and whisk until the sugar is completely melted. It will take a couple of minutes. You can test by touching the mixture between your fingers, and if you feel any sugar granules just keep whisking the mixture over the water bath.
-
Make sure the bottom of the bowl isn’t touching the simmering water because you don’t want the whites to cook.
-
Also, don’t overheat the sugar syrup, you are just looking to melt the sugar, no need to bring it to a certain temperature. Transfer the syrup to the bowl of a stand mixer.
-
Immediately start whipping the meringue on low for about 30 seconds, then increase the speed to medium. Whisk on medium-low speed for another two minutes. Raise to medium-high and finish whipping the meringue until it achieves stiff peaks. It takes me about 13 to 15 minutes to whip the meringue, but you shouldn’t go by time, go by what the meringue is supposed to look like because a lot of things can affect whipping time, such as the quality of the eggs, the weather, how powerful your mixer is, and more.
-
Once the meringue gets glossy and you start seeing streaks formed by the whisk, and the meringue raising in the center of the whisk, it might be time to stop.
-
You don’t want to over whip the meringue at this point because that can cause several issues, mainly hollow macarons.
-
Whisk until stiff peaks have formed. When you pull the whip up, the peak should be stiff and shooting straight up, with possibly a slight bend at the top, but not bending to the side.
-
Also when you swirl the whisk around in the bowl to collect the meringue, you should feel some resistance from the meringue. And when you look on the bottom of the whisk the meringue collected should be forming soft but defined waves.
-
Pour the sifted powdered sugar and almond flour into the stiff meringue.
-
Add the food coloring at this point, if using. I am using about 1 tbsp of red gel food coloring
-
Start folding gently forming a letter J with a spatula.
-
Once the dry ingredients have incorporated with the meringue, you can start squeezing the air out of the batter by pressing it down along the sides of the bowl as you fold.
-
It’s time to stop folding when the batter is glossy and has a thick and flowing consistency. First, pick up some batter with the spatula and try to draw a figure 8 with the batter that is dripping off the spatula. If you can form several 8 figures without the batter breaking up, that’s one indication that it might be ready.
-
-
The batter that’s falling back into the bowl should take 10 to 15 seconds to incorporate with the batter that’s already in the bowl.
-
When you hold the spatula with batter on top of the bowl and the batter falls off the spatula slowly but effortlessly the batter is ready. The batter will keep flowing off the spatula non-stop, but not too quickly.
-
Transfer the batter to the piping bag. I also like to seal the top with a bag tie, so the batter doesn’t dry out and it gives you more control while piping because there’s no risk of the batter escaping through the top of the piping bag.
-
Place the piping bag directly 90 degrees over the center of each macaron template. Apply gentle pressure and carefully pipe for about 3 to 5 seconds, and then quickly pull the bag up twisting slightly at the top.
-
Once you’ve piped as many circles as you could, bang the trays against the counter or against the palm of your hand a few times each.
-
Use a toothpick to pop any air bubbles in the surface of the shells.
-
Regardless if you are used to baking macarons without resting, these shells must rest because of the large amount of food coloring added to obtain the deep red color. Let them rest for as long as it takes to make them completely dry and not super soft to the touch. They must form a thick skin before you bake them, or they are likely to crack in the oven. When you touch the surface of a macaron and feels dry and somewhat firm to the touch, you can bake.
-
Bake one tray at a time.
-
I bake each tray for about 15 to 20 minutes. Baking time will vary greatly depending on your oven type or the temperature you are using. Depending on the oven, baking time can take as little as 13 minutes, or as long as 30.
-
When baked, the macarons will have a deeper color and formed feet. If you try to move a macaron, it shouldn’t feel jiggly. If the macaron is still jiggly, keep baking. Also try to touch the top of a macaron and it shouldn’t feel soft, if it’s still soft, keep baking.
-
Remove from the oven and bake the other tray.
-
Let the macarons cool down before proceeding with the filling and decorating.
Royal Icing
-
-
Place the powdered sugar in the bowl of a mixer. Add the meringue powder and start mixing on low. Gradually add the water with the mixer on. Once the ingredients incorporate, raise the speed to medium high and whip for a few minutes, until glossy and fluffy.
-
-
The icing should have a flowy consistency, it doesn’t necessarily have to be runny, but should be thick like sweetened condensed milk. If it’s too stiff, add more water to the icing, and if the frosting is too runny, add more powdered sugar to it, to make it thicker.
-
This makes a small batch so make sure your whisk can reach the bottom of the bowl to whip the icing properly, or it may not work out.
-
Divide the icing between two bowls. Color one black, and the other yellow. You will need a bit less of the yellow than you will need black, but you will have plenty of both. Place the black icing in a piping bag fitted with a size 3 tip, and place the yellow icing in a piping bag fitted with a size 2 tip. Don’t leave the icing uncovered because it will dry and form a crust. Keep the icing covered at all times.
Decorate the shells
-
To decorate the shells, pipe a line of black royal icing right in the middle of the shell, to make Santa’s belt.
-
Let the black icing dry for a few minutes, if you place it in the fridge, it dries super fast.
-
Then draw the buckle of Santa’s belt using the yellow icing, and drawing a square in the middle of the belt. You only have to do this on about half of the shells, because the other half will be the bottom shells.
Sugar Cookie Buttercream
-
Start by heat treating the flour. Pre-heat the oven to 350ºF. Spread the flour on top of a parchment or silicone lined baking tray. Bake in the oven for about 5 minutes, stirring the flour in between. Once the flour feels hot, remove from the oven and let it cool down before using in the frosting. This will make the flour safe to eat in the frosting.
-
Place the butter and sugars in the bowl of a mixer. Beat the mixture for about 4-5 minutes, to get it as creamy and smooth as possible. Add the flour, vanilla, almond extract and mix on low to incorporate. If needed add the extra milk or heavy cream. If the frosting is too runny, add more powdered sugar.
Fill the Shells
-
Place the buttercream in a piping bag fitted with a round tip. Pipe the buttercream on a bottom shell, and top with a decorated shell. Roll the sides of the macaron in the shredded coconut.
-
Storage
-
These macarons freeze super well for up to 1-2 months in the freezer. They keep well in the fridge for up to 5 days.
- Prep Time: 60
- Cook Time: 40
Nutrition
- Serving Size: 22
- Calories: 90